


A VPN is designed to create a secure, encrypted tunnel that hides your real IP address and routes all your traffic through a private server. However, sometimes this tunnel isn’t perfect — small gaps, known as VPN leaks, can allow bits of your real information to slip through. These leaks usually expose your IP address, DNS queries, or WebRTC data, which websites, ISPs, or even apps can use to identify you.
On mobile devices, leak testing is even more important than on desktops. Mobile operating systems like Android and iOS manage connections differently, often switching between Wi-Fi and mobile data, or using built-in DNS services that can bypass the VPN tunnel. Additionally, many mobile apps maintain their own network permissions or background connections that don’t always respect VPN routing. Combined with the frequent use of public Wi-Fi networks, these factors make smartphones and tablets more vulnerable to accidental exposure of user data.
By performing a VPN leak test, you can detect whether your VPN truly hides your identity and encrypts all data channels. This testing helps identify IP, DNS, and WebRTC leaks early — ensuring your real location, ISP, and browsing activities remain completely private and shielded from tracking or interception.
Understanding the Types of VPN Leaks
Even the most reliable VPNs can experience leaks under certain conditions. Understanding the different types of VPN leaks helps you know what to look for when testing on your Android or iOS device.
🔹 IP Leaks
An IP leak occurs when your real IP address — the unique number assigned to your device by your internet provider — becomes visible even though your VPN is supposed to mask it. This can happen if your VPN connection momentarily drops, or if specific mobile apps bypass the encrypted tunnel to connect directly to the internet. An exposed IP reveals your approximate location and can compromise anonymity.
🔹 DNS Leaks
When you visit a website, your device sends a DNS request to translate the domain name (like google.com) into an IP address. If these DNS requests go to your ISP’s DNS servers instead of your VPN provider’s, that’s a DNS leak. This means your browsing activity can still be tracked and logged — even while your VPN appears active. On mobile systems, DNS leaks can occur if the OS or browser uses its own secure DNS (like Google DNS or Cloudflare) outside the VPN tunnel.
🔹 WebRTC Leaks
WebRTC (Web Real-Time Communication) is a technology used by browsers and some apps to enable peer-to-peer features like video calls and file sharing. Unfortunately, it can expose your real local and public IP addresses even when you’re connected to a VPN. WebRTC leaks often occur in mobile browsers that support in-app video chats or real-time connections.
🔹 IPv6 Leaks
Many modern mobile networks support IPv6 (a newer version of the internet protocol), but not all VPNs are fully compatible with it. If your VPN only encrypts IPv4 traffic, your IPv6 address may leak outside the tunnel, revealing your identity. Disabling IPv6 or using a VPN with full dual-stack support (IPv4 and IPv6) can prevent this issue.
By identifying these four leak types — IP, DNS, WebRTC, and IPv6 — you can better understand how data might escape your VPN and take steps to correct it.
Preparing Your Mobile Device for Testing
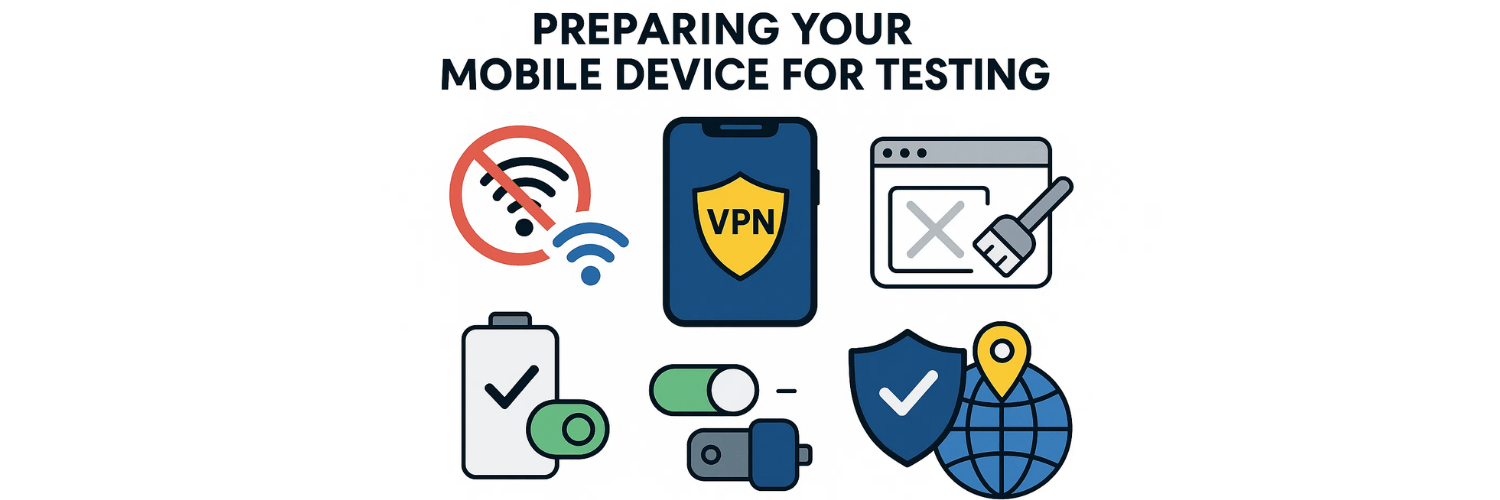
Before you start testing your VPN for leaks, it’s crucial to properly prepare your device. Testing without preparation can lead to inaccurate results or missed leaks. Follow these steps to ensure a clean, reliable test:
Disconnect from Mobile Data:
Use only Wi-Fi during the test. Switching between Wi-Fi and cellular data mid-test can cause false positives or trigger disconnections that appear as leaks.Clear Browser Cache and Cookies:
Old cached data, cookies, or saved IP information may distort the test results. Clear your browser’s cache before running any leak tests to make sure you’re seeing live data only.Disable Battery Optimization or Data Saver Modes:
On both Android and iOS, “battery saver” or “data saver” features may suspend or restrict VPN processes in the background, breaking the encrypted tunnel. Temporarily disable them before starting the test.Verify That the VPN Is Fully Connected:
Open your VPN app and ensure the connection icon or status shows active. Some VPNs take a few seconds after connecting before fully encrypting all traffic. Wait for confirmation before running tests.Select a Stable VPN Server:
Choose a nearby or reliable server to avoid timeouts or sudden drops during the test. Unstable connections can mimic leaks even when none exist.
Once these steps are complete, you’re ready to run online leak tests — such as vpntest.pro, dnsleaktest.com, or browserleaks.com — and analyze how your VPN performs under controlled conditions.
How to Test for VPN Leaks on Android
Testing your VPN on Android is an essential step to ensure your data is truly encrypted and your IP address is hidden. Android’s open architecture gives you flexibility — but it also increases the chance that some apps or system functions may bypass the VPN tunnel. Below are several ways to perform a complete VPN leak test on Android devices.
4.1 Using Built-In Tools and System Settings
You can start with simple, built-in checks before using advanced testing tools.
Check your current IP address before connecting the VPN:
Disconnect your VPN and go to a site like whatismyipaddress.com or ipinfo.io.
Note your real IP and approximate location.
Connect to your VPN and refresh the page:
If your VPN is working properly, the IP address should change to the VPN server’s location.
If the location remains the same, your VPN may not be routing all traffic through the tunnel.
Check DNS servers:
Open your Android network settings → Wi-Fi → tap your connected network → Advanced.
If you see public DNS servers like “8.8.8.8” (Google DNS) while connected to a VPN, that’s a potential DNS leak.
4.2 Using Online Leak Testing Tools
For deeper verification, use online tools that specialize in identifying leaks.
Step-by-Step Test with vpntest.pro
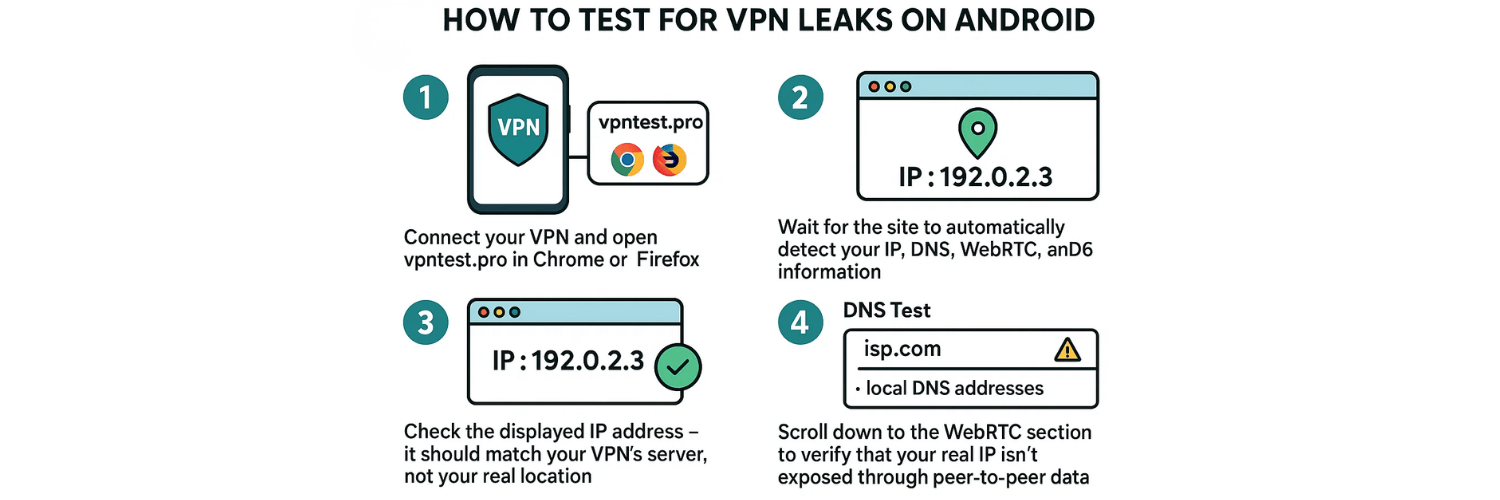
Connect your VPN and open vpntest.pro in Chrome or Firefox.
Wait for the site to automatically detect your IP, DNS, WebRTC, and IPv6 information.
Check the displayed IP address — it should match your VPN’s server, not your real location.
Review the DNS test section. If your ISP’s domain or local DNS addresses appear, you have a DNS leak.
Scroll down to the WebRTC section to verify that your real IP isn’t exposed through peer-to-peer data.
Other useful websites for cross-verification include:
dnsleaktest.com (for DNS queries)
browserleaks.com/webrtc (for WebRTC data)
ipleak.net (for combined IP/DNS/IPv6 testing)
These tests should all show your VPN’s IP and DNS, not your original ones.
4.3 Advanced Testing Using Apps
If you want even more control, several Android apps can help analyze network routing.
Network Analyzer or PingTools Network Utilities can display real-time DNS queries and connection routes.
Compare their results when your VPN is on and off — if traffic still flows through your ISP’s DNS, a leak exists.
Some VPNs include diagnostic logs that show whether DNS requests are tunneled securely — check these in your app’s settings or advanced menu.
How to Test for VPN Leaks on iOS (iPhone & iPad)

While iOS is generally more restrictive than Android, it still faces risks of IP and DNS leaks — especially when switching between Wi-Fi and cellular data or when apps establish direct connections. Testing on iPhone or iPad ensures your VPN is sealing all possible data leaks.
5.1 Verifying VPN Status in Settings
Start by confirming that your VPN is properly connected:
Go to Settings → VPN & Device Management → VPN.
Check that the status is Connected, and note the server name or region.
You should also see the small VPN icon (a rectangle with “VPN” letters) in the status bar at the top of your screen.
If the status shows Connecting or Not Connected, wait until it stabilizes before testing — running leak tests during reconnection may produce inaccurate results.
5.2 Running Online Leak Tests
Once your VPN is confirmed as active, follow these steps:
Open Safari or Chrome and visit vpntest.pro.
The site automatically performs IP, DNS, and WebRTC tests.
Review your public IP address — it should match your VPN provider’s server, not your local network.
Check the DNS test results. iOS often uses encrypted DNS (like iCloud Private Relay or Apple DNS) that may override your VPN. If your ISP’s DNS appears here, you’ve found a DNS leak.
Scroll down to check WebRTC and IPv6 leak results. Safari limits WebRTC access, but other browsers (like Firefox Focus or Chrome) may still expose it.
It’s also a good idea to compare results across two browsers — this helps identify app-level leaks that may bypass system VPN settings.
5.3 Using Third-Party Testing or Diagnostic Apps
There are trusted diagnostic tools available on the App Store for deeper analysis:
Network Analyzer, PingTools, or Fing can reveal which DNS servers are used for queries.
Some VPN apps like ProtonVPN or NordVPN offer built-in leak test features in their settings.
For the most advanced users, you can use Apple’s Configuration Profiles or WireGuard logs to confirm encryption routes and DNS tunneling.
These methods provide additional visibility beyond what web-based tools can detect.
How to Fix VPN Leaks on Mobile Devices
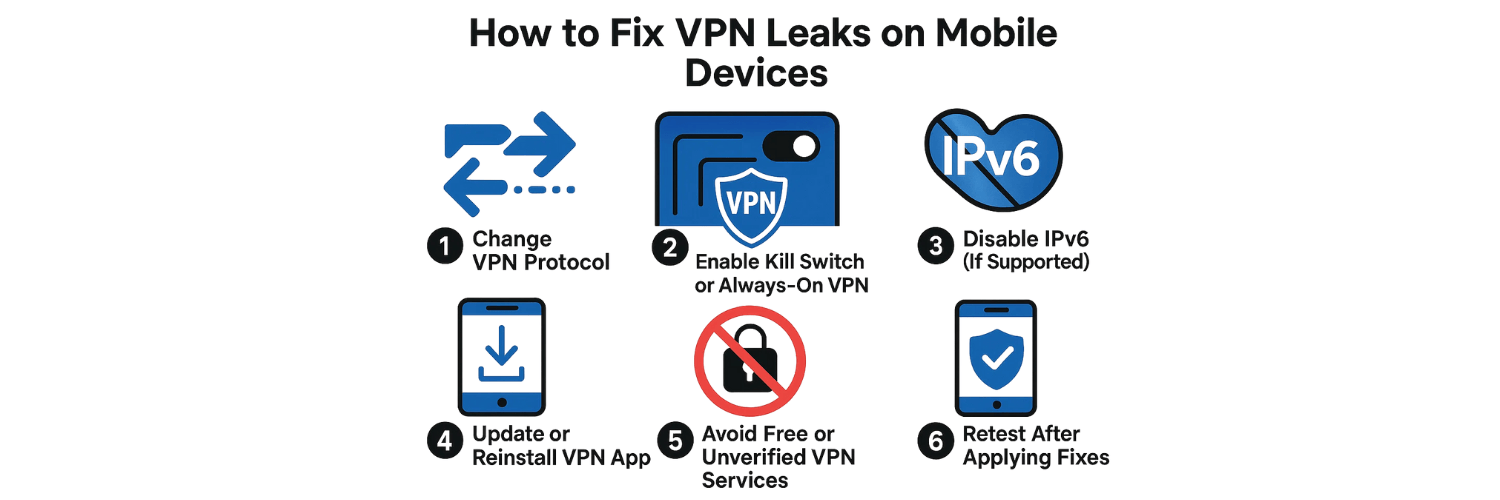
If your leak tests reveal that your VPN isn’t fully protecting your traffic, don’t worry — most leaks can be fixed easily through proper configuration and a few adjustments.
6.1 Change the VPN Protocol
Your VPN protocol determines how data is encrypted and routed. Switching protocols can often fix leak issues:
On Android: try switching from OpenVPN to WireGuard or IKEv2/IPsec in your VPN app settings.
On iOS: use IKEv2/IPsec or WireGuard for the most stable, leak-resistant connections.
Each protocol handles network switching and DNS differently — WireGuard, for instance, is known for its strong encryption and consistent tunneling on mobile devices.
6.2 Enable Kill Switch or Always-On VPN
A Kill Switch stops all internet traffic if your VPN disconnects unexpectedly — preventing IP or DNS leaks during dropouts.
Most modern VPN apps (like Surfshark, ProtonVPN, or ExpressVPN) include this feature under Security or Privacy Settings.
On Android 8.0 and later, you can go to Settings → Network & Internet → VPN → [Your VPN] → Always-on VPN + Block connections without VPN.
On iOS, some VPNs support “Always-on” configurations through device management profiles or their own app settings.
6.3 Disable IPv6 (If Supported)
IPv6 leaks occur when your VPN doesn’t encrypt IPv6 traffic.
Some VPNs automatically disable IPv6 while connected — but if not, you can manually disable it in advanced network settings or router configurations.
Alternatively, choose a VPN provider that supports full IPv6 tunneling.
6.4 Update or Reinstall the VPN App
Outdated VPN apps may contain bugs or broken configuration files that cause leaks.
Always keep your VPN app and operating system updated to the latest version.
If problems persist, uninstall the VPN app completely, restart your device, and reinstall it from the official store.
6.5 Avoid Free or Unverified VPN Services
Many free VPNs fail to route DNS properly or log your data for monetization. They may claim encryption but leak traffic through unprotected channels.
Choose a trusted VPN provider with a no-logs policy, independent security audits, and strong leak protection features.
6.6 Retest After Applying Fixes
After adjusting your settings:
Reconnect your VPN and return to vpntest.pro.
Run all tests again (IP, DNS, WebRTC, IPv6).
Confirm that only your VPN provider’s IP and DNS servers appear — no traces of your ISP or local network should be visible.
Performing this verification ensures that your VPN is functioning as a complete privacy shield, not just a partial one.
Retesting After Applying Fixes
Once you’ve applied all the recommended fixes — such as switching protocols, enabling kill switch, or updating your VPN app — it’s essential to perform a retest to confirm that the leaks are fully resolved.
7.1 Why Retesting Is Important
Fixing settings doesn’t guarantee success until you verify that every type of leak is closed. Some issues may persist due to device-specific configurations, outdated DNS caches, or router-level leaks. Retesting ensures your privacy is fully restored and that the VPN tunnel is airtight.
7.2 How to Retest Effectively
Reconnect your VPN after making configuration changes.
Restart your device — this clears cached DNS and network routes that could affect test accuracy.
Visit vpntest.pro and rerun all available checks:
IP Leak Test → confirms your IP is masked.
DNS Leak Test → ensures DNS queries use your VPN’s servers.
WebRTC Leak Test → checks if browser or app-based IP exposure is fixed.
IPv6 Test → ensures your VPN handles or blocks IPv6 traffic properly.
Compare the new results to your previous test. Only your VPN’s server IP and DNS addresses should appear.
7.3 Document Your Results
For advanced users, keeping a simple record (screenshots or notes) of your before-and-after results can help identify patterns or persistent issues. This can also assist when contacting VPN support for further troubleshooting.
Best Practices for Ongoing VPN Security on Mobile
Leak protection is not a one-time task — maintaining VPN security on mobile requires consistent habits and awareness. Follow these best practices to ensure your VPN remains reliable:
Enable Auto-Reconnect or Always-On VPN:
Prevent accidental exposure when switching between Wi-Fi and mobile data.Keep Software Updated:
Regularly update your VPN app, browser, and OS to patch vulnerabilities and maintain compatibility with the latest encryption standards.Avoid Public Wi-Fi Without a VPN:
Public hotspots are prime targets for attackers. Always connect your VPN before browsing, logging in, or making online payments.Use Trusted VPN Providers Only:
Choose VPNs with transparent privacy policies, independent security audits, and proven DNS leak protection (e.g., NordVPN, ProtonVPN, ExpressVPN).Test Regularly:
Run a VPN leak test every few weeks — or after major OS/VPN updates — using tools like vpntest.pro to ensure nothing has changed.Disable “Smart” DNS or Private Relay Features (on iOS):
These can interfere with VPN routing and expose your true DNS.Avoid Switching Networks While Connected:
Disconnect your VPN before moving from Wi-Fi to mobile data to prevent brief exposure windows.Use Strong Authentication:
If your VPN supports MFA (Multi-Factor Authentication), enable it to protect against unauthorized access to your VPN account.
By following these ongoing practices, you can maintain full VPN integrity and ensure continuous protection against IP, DNS, or WebRTC leaks on any mobile device.
Conclusion: Stay Proactive About Your Mobile Privacy

Testing your VPN for leaks is a crucial part of maintaining true online privacy — especially on mobile platforms where background processes, multiple networks, and app permissions can complicate traffic routing.
By understanding how leaks occur, learning to detect them using tools like vpntest.pro, and applying targeted fixes, you can secure your mobile browsing environment completely.
Remember that VPN protection isn’t just about hiding your IP — it’s about maintaining a secure, encrypted, and trusted connection across all your apps and network activities. With regular testing, strong VPN configurations, and smart digital hygiene, your Android and iOS devices can stay fully private and protected in today’s surveillance-heavy internet landscape.
10 Most Common FAQs About Testing VPN Leaks on Mobile Devices

1. How often should I test my VPN for leaks?
You should test your VPN at least once a month, and always after major OS updates, VPN app updates, or changes to your network provider.
2. Are mobile VPNs as secure as desktop ones?
Yes, if configured correctly. However, mobile devices have additional risks such as app-level connections and frequent network switching, which make regular leak testing more important.
3. Can I test VPN leaks using mobile data instead of Wi-Fi?
Yes, but results can vary depending on carrier routing and NAT settings. For accuracy, use Wi-Fi first, then test again on mobile data to compare.
4. What does it mean if vpntest.pro shows my ISP’s DNS servers?
It means you have a DNS leak — your DNS requests are bypassing the VPN tunnel. Try switching VPN protocols, enabling DNS leak protection, or using a different VPN server.
5. Is WebRTC a major issue on mobile browsers?
Yes, especially on Android browsers like Chrome or Firefox. On iOS, Safari limits WebRTC access, but other browsers may still expose your IP via WebRTC requests.
6. How do I fix IPv6 leaks on Android and iOS?
You can disable IPv6 in network settings (on some devices) or choose a VPN that fully supports IPv6 tunneling to prevent traffic from leaking through that protocol.
7. Can battery-saving or data-saving modes cause VPN leaks?
Yes. These modes can pause background processes or restrict the VPN’s access to network resources, leading to traffic bypass. Always disable them during testing.
8. What’s the difference between IP leaks and DNS leaks?
An IP leak exposes your device’s physical location, while a DNS leak exposes the websites you visit. Both compromise privacy and must be tested separately.
9. Should I clear cache and cookies before testing my VPN?
Absolutely. Cached IP or DNS data can cause inaccurate test results. Always clear your browser cache and restart your device before running a leak test.
10. Do free VPNs pass leak tests?
Rarely. Most free VPNs suffer from DNS or IP leaks because they lack proper encryption or use insecure routing. Always choose reputable, paid VPN providers for real privacy.
Tags

About VPNTest
Content Specialist with expertise in cybersecurity and online privacy. Sarah has been testing and reviewing VPN services for over 5 years and regularly contributes to leading tech publications.
View all articles by VPNTest →Related VPNs


Never Miss an Article
Subscribe to our newsletter to receive the latest VPN guides, security tips, and industry news directly in your inbox.