
A VPN should hide your activity, but that falls apart the moment your device sends DNS requests outside the VPN tunnel. When it happens, your internet provider can still see which websites you try to visit, even if everything else is encrypted. That quiet exposure is what we call a DNS leak.
If a leak test still shows your ISP’s DNS servers—or a site reveals your real location—you’re likely dealing with one. The good news is that DNS leaks are straightforward to identify and fix. This guide explains what causes them, how to test for them, and the steps you can take on Windows, macOS, routers, and browsers to stop them.
What Is A DNS Leak And Why It Matters
DNS is the system that helps your device look up the IP address behind a website name — almost like the internet’s phonebook. Every time you type a domain into your browser, your device sends a DNS request to a DNS server so it knows where to go next.
When you use a VPN, those DNS requests should travel through the encrypted tunnel and be handled by the VPN’s own DNS servers. A DNS leak happens when those requests slip outside the tunnel and go straight to your ISP DNS instead. The VPN might still hide your IP, but your browsing activity is exposed because the DNS path didn’t stay where it should.
This kind of leak reveals more than most people realize. Your provider can see the domains you visit, the times you access them, and in many cases link those requests to your real location. Because DNS queries are small and quick, a vpn dns leak rarely triggers an error or warning — everything loads normally, so you often don’t notice it happening.
The real signs tend to be subtle:
a leak test shows ISP DNS servers instead of your VPN’s
a website displays your real region
different pages load as if you’re not using a secure dns vpn at all
Once you understand how DNS works, spotting these issues becomes much easier — and fixing them is simply a matter of closing the gaps that let those requests leak out.
What Causes A DNS Leak
A DNS leak can come from several different places in your setup. Most of them have nothing to do with the quality of your VPN and everything to do with how your device handles dns requests behind the scenes. Here are the most common reasons your DNS might slip outside the encrypted tunnel.
Improper VPN Configuration
Some VPNs don’t force DNS through their tunnel unless you enable the right setting. When that happens, your device continues sending queries to ISP DNS instead of the VPN’s dns servers, which creates an instant leak.
A second cause is a VPN that still uses your provider’s DNS by default. Even if your IP is hidden, your browsing activity goes straight to your ISP because the DNS path wasn’t replaced. Older or basic VPN apps can also lack built-in dns leak protection, leaving the system to decide where those requests go.
IPv6 DNS Leaks
Most people focus only on IPv4, but modern devices often prefer IPv6 when it’s available. The problem is that many VPNs only handle IPv4 inside the tunnel. When your system sends an IPv6 query, the VPN doesn’t catch it, and the request goes out bare.
This is why IPv6 dns leaks are so common. Your OS quietly switches to IPv6, the VPN only protects IPv4, and suddenly your real location is exposed through IPv6 DNS traffic. These leaks usually go unnoticed unless you test for them directly.
Network Or Router DNS Overrides
Your router plays a big role in where your DNS requests end up. If it’s configured to use the ISP’s DNS, it can override your device settings the moment you connect. The same thing can happen when DHCP pushes its own DNS during the network handshake.
Public Wi-Fi networks take this even further. Many inject forced DNS rules to keep traffic predictable, which means your VPN has to fight against their routing. Some providers even use transparent DNS proxies — an ISP-level interception that captures dns requests before the VPN can reroute them.
Windows Features That Bypass VPN
Windows has a few built-in features that try to speed up name resolution, but they often get in the way of a secure dns setup. Smart Multi-Homed Name Resolution sends queries to multiple servers at once and accepts whichever responds first. If one of those servers belongs to your ISP, that’s a dns leak.
Teredo is another issue. It’s an IPv6 transition tool that can take priority over your VPN tunnel and push traffic outside it. Add in Windows’ DNS fallback behavior and the occasional split-routing situation, and it’s easy for a vpn dns leak to appear even when the VPN seems connected.
VPN Disconnections And No Kill Switch
If your VPN drops for a second and you don’t have a kill switch on, your device immediately falls back to normal DNS. Many users never notice this because the page keeps loading, but all those dns requests are now going through the ISP.
Even switching from Wi-Fi to Ethernet — or moving between networks — can trigger this fallback. Without a kill switch, those requests leave the secure tunnel and expose the domains you access until the VPN reconnects.
How To Test For DNS Leaks (Fast And Accurate)

Checking for a DNS leak only takes a minute, and it’s the easiest way to see whether your DNS requests are staying inside the vpn tunnel. You don’t need any technical experience — just follow these steps.
Step 1: Disconnect Your VPN And Note Your Original DNS
Start with a clean baseline. Turn your VPN off and run a dns leak test on the VPNTest.Pro testing page.
The results will show your real IP, your current dns servers, and your actual location.
You’ll compare this with the next test.
Step 2: Connect Your VPN
Now open your VPN and connect to any server. The country doesn’t matter — you just want your DNS routed through the VPN instead of your ISP. Give it a few seconds to fully establish the tunnel.
Step 3: Run The DNS Leak Test Again
Refresh the VPNTest.Pro test page with the VPN still on.
If the results still show ISP DNS, you have a leak.
If you only see the VPN’s DNS servers, the tunnel is working the way it should.
For extra accuracy, you can also check for dns leaks using ipleak.net and dnsleaktest.com. Different tools pick up different patterns, so it’s worth running more than one.
How To Fix DNS Leaks Quickly (Instant Fixes)
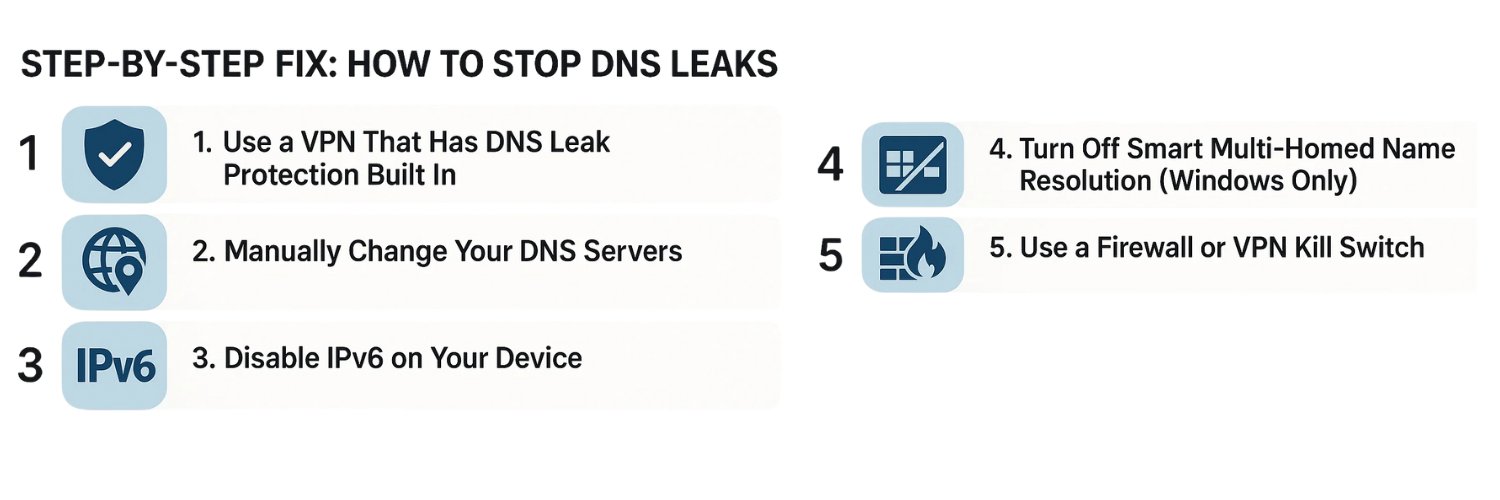
If your dns leak test shows ISP servers, you can usually stop the leak with a few simple adjustments. These quick fixes work on most devices and don’t require deep configuration.
Enable DNS Leak Protection In Your VPN App
Most VPN apps include a setting that forces all dns requests through the VPN’s own DNS servers. Turn on any option that mentions:
“Use VPN DNS”
“Prevent DNS leaks”
“Force DNS routing”
Once these settings are active, your device stops sending DNS queries to the ISP and keeps them inside the encrypted tunnel.
Disable IPv6 On Your Operating System
A large number of vpn dns leak issues come from unprotected IPv6 traffic. Many VPNs cover IPv4 only, so your device sends IPv6 DNS queries outside the tunnel without warning.
Turning off IPv6 closes that gap completely.
This works on both Windows and macOS and immediately blocks IPv6-based leaks.
Flush DNS Cache
Your system may still hold old DNS entries that point outside the VPN. Clearing the cache refreshes everything so your device uses the correct DNS path again.
Windows: ipconfig /flushdns
macOS: sudo killall mDNSResponder
Linux: sudo systemd-resolve --flush-caches
After flushing, run another leak test to confirm the change.
These quick fixes handle most leaks. If the problem continues, the next sections in your blog (router DNS, Windows features, browser settings, etc.) will cover deeper issues step-by-step.
How To Stop DNS Leaks On Windows
Windows systems leak DNS more often than people think. Several built-in features can bypass the VPN tunnel and send dns requests straight to your ISP. The steps below close every major leak point on Windows.
Disable IPv6
IPv6 often takes priority over IPv4 on Windows. If your VPN supports only IPv4, your device may send IPv6 DNS queries outside the encrypted tunnel without warning.
How to disable it:
Open Control Panel → Network and Sharing Center
Click Change adapter settings
Right-click your active connection → Properties
Uncheck Internet Protocol Version 6 (TCP/IPv6)
Click OK and restart your device
Why this stops leaks:
Disabling IPv6 forces Windows to use IPv4 only, which most VPNs handle correctly inside the tunnel.
Disable Smart Multi-Homed Name Resolution (SMHNR)
SMHNR is a Windows feature that sends DNS queries to multiple DNS servers at once. It chooses whichever responds first — even if that response comes from your ISP. This creates a silent dns leak.
How to disable it (Windows Pro/Enterprise):
Press Win + R, type gpedit.msc, press Enter
Go to:
Computer Configuration → Administrative Templates → Network → DNS ClientFind Turn off smart multi-homed name resolution
Set it to Enabled
Why this matters:
This forces Windows to stick to a single DNS route — the one your VPN provides.
Disable Teredo
Teredo is a tunneling protocol that helps IPv6 work on IPv4 networks. The problem is that it can override your VPN tunnel and send DNS traffic outside it.
Disable it with one command:
netsh interface teredo set state disabled
Why this helps:
Teredo creates a second tunnel Windows may prefer. Disabling it removes another path that can leak DNS.
Force Your Adapter To Use VPN DNS
Windows can still fall back to ISP DNS if your adapter has leftover entries. Setting a “null” DNS blocks that fallback.
How to do it:
Connect your VPN
Open Network Connections
Right-click your active adapter → Properties
Select Internet Protocol Version 4 (TCP/IPv4) → Properties
Click Advanced → DNS
Add 0.0.0.0
Save and close all windows
Why this works:
0.0.0.0 prevents Windows from using your ISP DNS when the VPN is active. Your adapter can’t override the VPN DNS anymore.
Re-Test After Fixing
After applying the changes:
Connect your VPN
Run a test at VPNTest.Pro
Cross-check with dnsleaktest.com or ipleak.net
If no ISP DNS servers appear, your Windows vpn dns leak is fixed.
How To Stop DNS Leaks On Mac
macOS doesn’t leak DNS as often as Windows, but when it happens, it usually comes from incorrect DNS entries or IPv6 routing outside the VPN tunnel. These steps close the main leak points on Mac.
Remove Manual DNS Entries
Many Mac users add custom DNS servers at some point (Google, Cloudflare, OpenDNS). When those entries stay in the system, macOS may keep using them even after the VPN connects — which creates a dns leak.
How to remove them:
Open System Settings → Network
Select your active connection (Wi-Fi or Ethernet)
Click Details
Go to the DNS tab
Remove every DNS server in the list
Save the changes
Why this matters:
Static DNS entries override the secure dns vpn path. By clearing the list, macOS returns to automatic DNS, allowing the VPN to take full control.
Flush DNS Cache
macOS stores past DNS lookups. If those cached entries point outside the VPN tunnel, your device may keep leaking until the cache is cleared.
Flush the cache via Terminal:
sudo killall -HUP mDNSResponder
(You won’t see characters while typing your password — that’s normal.)
Why flushing helps:
It forces macOS to refresh DNS routes so the VPN’s DNS servers are used instantly.
Disable IPv6 If Your VPN Does Not Support It
Some macOS systems prefer IPv6 automatically. If your VPN only tunnels IPv4, macOS may send IPv6 DNS queries directly to the ISP. That’s a classic ipv6 dns leak.
How to turn off IPv6 on Mac:
Open System Settings → Network
Select your active connection
Click Details
Go to TCP/IP
Under Configure IPv6, choose Link-local only or Off (depending on macOS version)
Save the changes
Why this works:
Disabling IPv6 removes a path your VPN can’t protect. All DNS requests stay inside the VPN tunnel.
How To Fix IPv6 DNS Leaks
Most users focus on IPv4 leaks, but IPv6 leaks are just as common — and much easier to miss. If your VPN doesn’t handle IPv6, your device may send IPv6 DNS queries straight to your ISP while the rest of your traffic stays inside the tunnel. This section closes that gap completely.
Disable IPv6 System-Wide
If your VPN does not support IPv6, switching it off is the safest and fastest dns leak ipv6 fix.
On Windows:
Go to Network Connections
Right-click your active adapter → Properties
Uncheck Internet Protocol Version 6 (TCP/IPv6)
Save and restart
On macOS:
Open System Settings → Network
Select your connection → Details
Go to TCP/IP
Set Configure IPv6 to Off or Link-local only
Save
Why this works:
Disabling IPv6 blocks the path that causes most ipv6 dns leak scenarios.
Use A VPN That Blocks Or Supports IPv6
Some VPNs ignore IPv6 completely, which leaves part of your traffic unprotected. A good VPN should:
Block IPv6 by default, or
Tunnel both IPv4 and IPv6 inside the encrypted connection
If your current software doesn’t offer either, it’s likely the source of your vpn dns leak. Switching providers may be the only long-term fix.
Re-Test IPv6 Using VPNTest.Pro
Once you change your settings, test again to confirm the leak is gone.
Connect your VPN
Run the IPv4 + IPv6 DNS Leak Test at VPNTest.Pro
Make sure no ISP DNS servers appear — on either protocol
If only your VPN’s DNS servers show up, your secure dns vpn configuration is correct.
How To Fix DNS Leaks On Your Router
A router can leak DNS even when your device and VPN are configured correctly. If the router forces its own DNS or accepts DNS pushed by the ISP, your traffic may bypass the VPN tunnel before it reaches your device. These steps close the main dns leak router fix issues.
Change Router DNS To Cloudflare Or Google
Routers often default to ISP DNS, which creates leaks the moment the VPN disconnects or when devices connect without proper DNS routing.
Switch to trusted DNS servers:
Cloudflare: 1.1.1.1 / 1.0.0.1
Google DNS: 8.8.8.8 / 8.8.4.4
Why this helps:
It stops ISP-level DNS logging and reduces forced DNS redirects that cause leaks on home networks.
Disable “Use DNS Advertised By ISP”
Many routers have a setting that allows the ISP to push DNS values through DHCP. If enabled, the router ignores your manual DNS entries and reverts to ISP DNS—creating a leak immediately.
How to fix it:
Open router admin panel
Go to WAN, Internet, or DHCP settings
Turn off any option labeled:
“Use DNS advertised by ISP”
“Obtain DNS automatically”
“ISP-assigned DNS”
Save and reboot
Why it matters:
DHCP DNS override is one of the most common router-level leaks people never notice.
Disable IPv6 Or Set Custom IPv6 DNS
Routers that support IPv6 often send IPv6 DNS queries directly to the ISP. If your VPN only tunnels IPv4, those IPv6 DNS calls will leak every time.
You have two choices:
Option 1 – Disable IPv6 entirely
This fully removes the IPv6 leak path.
Option 2 – Set custom IPv6 DNS
Use Cloudflare or Google IPv6 DNS if your network needs IPv6.
Why this works:
It prevents dual-stack routing from sending DNS outside the VPN tunnel.
Prevent DNS Override On Public Networks
Public Wi-Fi networks often inject their own DNS using captive portals or transparent DNS proxies. Even if your router is secure at home, this becomes a leak source when you connect elsewhere.
To avoid this:
Always connect to your VPN before browsing
Enable kill switch and DNS leak protection
Avoid networks that force DNS redirection
Why this matters:
Public networks are the most aggressive at rewriting DNS, and your router settings can’t protect you once you leave home.
How To Fix DNS Leaks In Your Browser
Even if your VPN is configured correctly, your browser can still leak DNS. Features like Chrome Secure DNS, Firefox DoH, or WebRTC can override the VPN’s DNS settings and send requests outside the tunnel. Fixing these on the browser level closes the last major leak path.
Disable Secure DNS In Chrome, Edge, And Opera
Most Chromium-based browsers include a feature called Secure DNS (also known as DNS-over-HTTPS).
It sounds helpful, but when using a VPN, it often creates a vpn dns leak by bypassing the encrypted tunnel and sending DNS requests to Cloudflare, Google, or the ISP.
How to disable it (Chrome, Edge, Opera):
Open Settings
Go to Privacy and Security → Security
Scroll to “Use secure DNS”
Turn it off
Why this matters:
Secure DNS ignores the VPN’s DNS routing and uses whatever DNS provider the browser prefers. Turning it off ensures dns requests stay inside the VPN tunnel.
Turn Off DoH In Firefox
Firefox handles DNS differently. It can use DNS-over-HTTPS (DoH) even when a VPN is active, which sends DNS queries outside the VPN’s protected path.
To disable DoH:
Open Settings
Go to Privacy & Security
Scroll to Enable DNS over HTTPS
Set it to Off
Alternative for advanced users:
If your VPN supports its own DoH resolver, you can switch Firefox DoH to “Use provider” and match it with your VPN’s DNS. For most users, turning it off is the safest option.
Why this helps:
Firefox DoH routes DNS independently and can reveal your browsing activity even though the IP is protected.
Fix WebRTC Leaks
WebRTC is built into almost every modern browser and can reveal your real IP even when your VPN is active. It bypasses both the VPN and DNS settings — meaning your location can leak through STUN requests.
Firefox WebRTC Fix
Type about:config
Search for: media.peerconnection.enabled
Set it to false
Chrome WebRTC Fix
Chrome doesn’t let you disable WebRTC entirely, so use an extension such as:
WebRTC Network Limiter
WebRTC Control
Microsoft Edge WebRTC Fix
Edge supports the same Chrome extensions:
Install WebRTC Control
Enable “Prevent IP leakage”
Why WebRTC leaks happen:
WebRTC uses direct peer-to-peer communication and prefers local interfaces, which sit outside your vpn tunnel. This can expose your IP even if the rest of your connection is routed through encrypted dns servers.
How To Prevent DNS Leaks Long-Term
Fixing a leak once is good. Preventing it from happening again is better. These long-term habits keep your dns requests inside the VPN tunnel and reduce the chance of a future vpn dns leak.
Use A VPN With Private DNS Servers
Choose a VPN that runs its own private DNS servers instead of relying on third-party or ISP DNS.
This ensures every lookup stays inside the encrypted tunnel, not on your network or router.
A strong VPN should automatically:
Route all DNS through its own servers
Block IPv6 or support it natively
Prevent fallback to ISP DNS
This is the most reliable form of dns leak prevention.
Enable Kill Switch
A kill switch blocks all internet access if your VPN disconnects.
Without it, Windows, macOS, and mobile devices instantly fall back to ISP DNS — causing a leak even if the drop lasts a second.
Turning the kill switch on ensures your device never makes a DNS request outside the secure vpn tunnel.
Test Regularly (Weekly Or After Updates)
DNS behavior changes after:
OS updates
Browser updates
Router reboots
VPN software updates
Switching networks
Run a quick vpn leak test at least once a week or whenever something changes.
VPNTest.Pro, ipleak.net, and dnsleaktest.com give accurate results in seconds.
Keep Router Firmware Updated
Outdated routers often override device DNS and push ISP DNS through DHCP.
Updating fixes bugs, improves DNS handling, and prevents router-level leaks that bypass your VPN.
This step is especially important if multiple devices use the same network.
Avoid VPN Browser Extensions As Your Main VPN
Browser extensions cannot protect the entire device.They don’t control system DNS, so leaks happen even while the extension appears connected.Use the full VPN app instead. Extensions are useful only for lightweight tasks—not for blocking dns leaks.
Conclusion
A DNS leak is one of those problems you don’t notice until it exposes more than you expect. The good news is that most leaks are easy to catch and even easier to fix once you know where to look. Whether the issue comes from IPv6 traffic, router overrides, Windows features, or a misconfigured VPN, the steps in this guide give you everything you need to stop leaks quickly and keep your browsing private.
Make DNS leak testing a regular habit, use a VPN that handles its own DNS, and keep your system settings clean. A few minutes of checks can prevent months of quiet exposure. If your tests show only your VPN DNS servers, you’re protected and ready to browse with confidence.
FAQs
Are DNS Leaks Dangerous?
Yes. A DNS leak exposes the websites you try to visit, your location, and your ISP-level metadata. Even if your VPN encrypts your traffic, DNS leaks reveal your browsing patterns.
Does Incognito Mode Prevent DNS Leaks?
No. Incognito mode only clears local history and cookies. It does not change how your device handles DNS, so your ISP can still see DNS lookups.
Does A VPN Browser Extension Prevent DNS Leaks?
No. Browser extensions don’t control system DNS. They protect only browser traffic, so your device may still send DNS requests outside the VPN tunnel.
Can My Router Cause A DNS Leak?
Yes. Routers often override device DNS and push ISP DNS via DHCP. If your router or ISP forces DNS, your device leaks DNS even with a VPN.
Tags
About VPNTest
Content Specialist with expertise in cybersecurity and online privacy. Sarah has been testing and reviewing VPN services for over 5 years and regularly contributes to leading tech publications.
View all articles by VPNTest →


Never Miss an Article
Subscribe to our newsletter to receive the latest VPN guides, security tips, and industry news directly in your inbox.